NewZed
-
Posts
6700 -
Joined
-
Last visited
-
Days Won
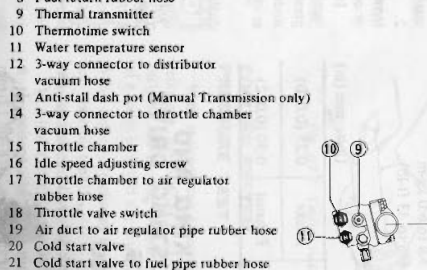
72
Content Type
Profiles
Forums
Blogs
Events
Gallery
Downloads
Store
Everything posted by NewZed
-
And, of course, there's always the possibility that you have a bad pickup coil in the distributor. Confirm proper resistance and air gap. But, you have two in there so you can always use the other.
-
Make sure that you're not losing power to your toggle switch when you turn the key to Start. The ignition system turns off all accessory power during Start to give maximum current to the coil. Start and Run are two different circuits.
-
There should be some troubleshooting steps here - https://static.summitracing.com/global/images/instructions/msd-6425.pdf
-
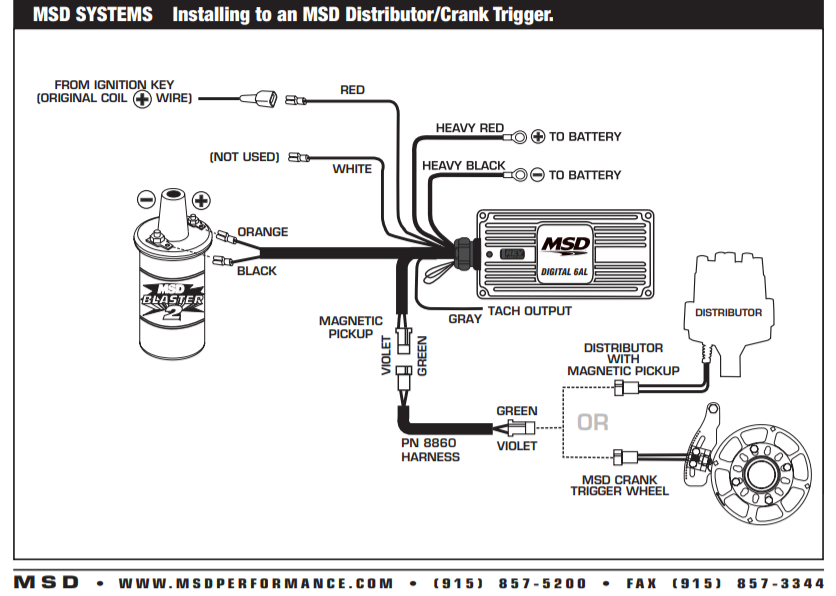
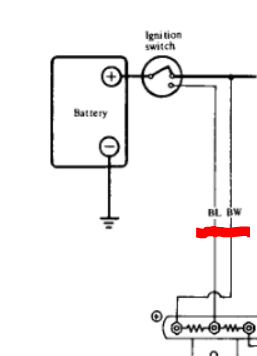
No, you want to connect the BW and BL wires from your ignition switch directly and together to the thin red wire. They provide the power to the MSD box with the key on and during Start. Power from the thick red wire passes through the box to the coil positive. The thin red wire turns the box on. If you're using a relay or switch for the thin red wire power, instead of the ignition switch, and it stays on while you're trying to to Start, then their might be something wrong with the box. It should spark if the thin red wire has power and all of the other wires are connected as shown.
-
I mis-wrote in my other post. MSD runs all power through the MSD box. There's an ignition wire, red, and a "heavy" power wire, also red. You only show one red wire, not real clear which one. By your drawing, you're missing one red wire. The BW and BL wires should both be connected to the thin red ignition wire, "original coil + wire". Yours would be the "magnetic pickup" scheme.

-
Worth buying 1971 240z? -- Engine swap??
NewZed replied to jcris22's topic in S30 Series - 240z, 260z, 280z
It's an old car that looks cool. Some people buy them just to have them in the garage, and never actually drive them. If you're looking for a daily driver, read through the many threads on this site to see what's involved in keeping them running. Looks like you should plan on having two cars for a while. Ideally, the other will be a truck so that you can haul parts, like engines and transmission. And expect to spend some money. Nickels and dimes will add up quickly. If it didn't need time and money he probably wouldn't be selling it. Lastly - do you like your neighbor now? Because you're going to find all of the "previous owner" stuff he did. Or he might be hanging out all the time pining over his old car. -
Make sure that the original module is disconnected. And think of the MSD box as the make/break circuit on the grounded side, the negative side, of the coil. The coil gets power, the MSD box lets current flow, the MSD box cuts the current when the trigger wires tell it to...spark happens. Break it down in to the basics.
-
L = Blue
-
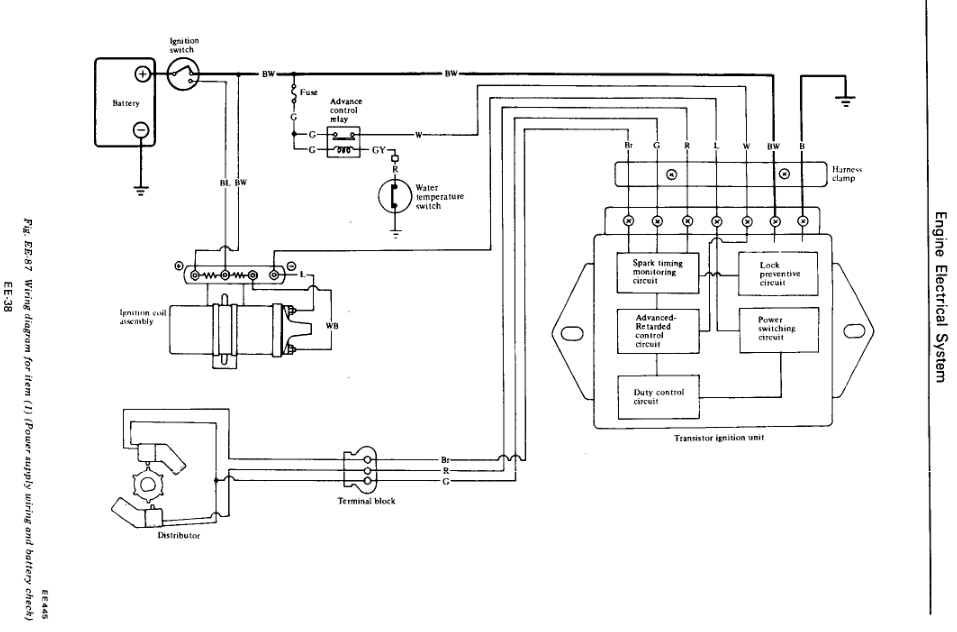
MSD has a wiring diagram and instructions. Probably better to use that. The first diagnostic test is to measure coil voltage with the key On and at Start. No power, no spark. Coil power doesn't come through the MSD box. There are two power wires for 1976.
-
I think that that type of thought process is what started his problem.
-
Odd, somebody must have started from basics but overlooked the old system. And never finished the job. Beware, there's a problem with the 280Z's that drains the battery after the Atlanticz method. The brake warning lamp check relay stays on after the swap. 1976 for sure, not sure about 75 and 77. There's another wiring scheme out there but it leaves the Charge light off. There are a few threads around the internet about it. Good luck.
-
-
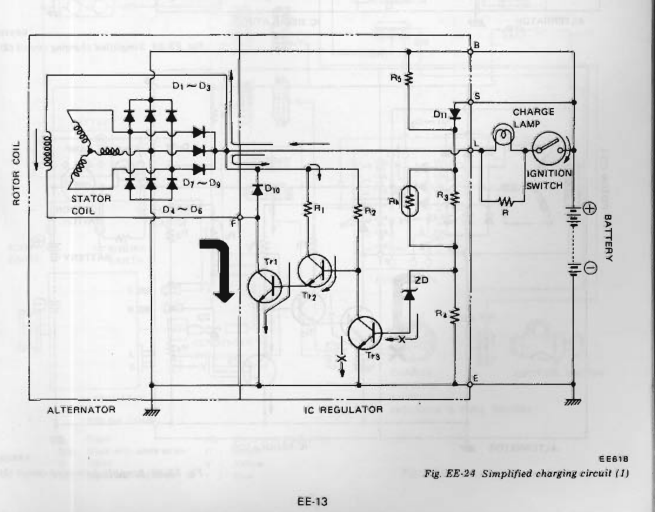
Here's some good stuff. Diagrams are farther down and S and L are ID'ed. The alts are all similar. http://www.atlanticz.ca/zclub/techtips/alternatorswap/index.html
-
He said he doesn't have a charge light. You do. So it can't be exactly the same. Dig in to S and L and forget about wire colors. Use a meter.
-
What year 280Z? And do you know if the alternator is internally regulated (it probably is but you never know)? Internally regulated alternators are actually super simple to wire up. S connects to battery/charge wires. L connects to the light in the voltmeter. Sounds like the PO got his S and L backward and rigged some things up to try to make sense of what was happening. Some of the alternators actually have S and L molded into the alternator case. I'd start over and focus on those two wires. The light nthe meter is not an LED. It's just a bulb behind a red lens.
-
You seem to have too many "lights". A bulb and an LED. Where did this wiring scheme come from, it's odd? Sounds like the "S" wire is not connected. It Senses charge voltage and the regulator uses it to regulate voltage. Your "bulb" must be connected to the L circuit. When it's disconnected the windings lose power and charging stops. Not clear why the gauge has a red LED. Is it the stock gauge or some aftermarket gauge? Is this a new problem or has the wiring scheme never worked? You have some wrongness going on.
-
No. ZX's don't have mustache bars. The R180 mustache bar is different from the R200 mustache bar. It's possible to stretch and oblongate and torque and pry a variety of parts in. Get the parts and start installing. That's what most do. There's always some part you'll have missed or some modification you'll need to do. Good luck. Don't forget the speedo gear.
-
You'll need an R200 mustache bar and cross brace to replace your R180. The T5 needs some custom work as Sleeper noted. The propeller shaft from the ZX won't swap over and your 240Z one won't work, you'll need a custom length. The T5 doesn't really offer much more than a stock 5 speed. "T5" is a name for hundreds of different types of Borg Warner transmissions. It doesn't mean super-strong. The T5 swap is where the fabrication and cost is. Find a 71B 5 speed and the swap will be bolt on/straight swap parts, no fab required. Many people use the 71B behind the turbo engines.
-
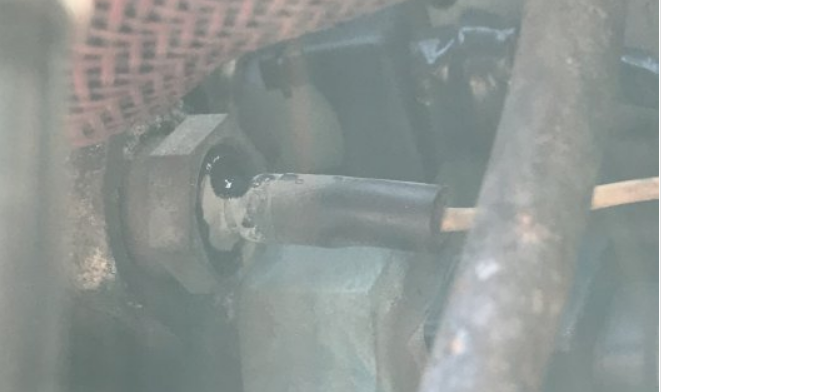
The thin wire is probably soldered to the bottom of the well where the actual sensing element is. Follow the yellow wire back in to the harness until you find a break. I don't think it goes all the way to the gauge. Probably a bullet connector somewhere.
-
I tore my coolant temperature sensor apart like that on my 76. Oops. The coolant temp. sensor has a well like yours. Somebody might have repurposed one on yours. Not really sure what to tell you now. You might work your way back on the yellow wire and see if there's a bullet connection in to the harness. Take it apart there. Or you could just buy a new sender. One problem for you though is to be sure you have a spot for in the T-stat housing. Nissan used several different bore and thread sizes. I think that all four holes are different. Looks like you're n the right hole though. Not sure what a PO put in there. Flip the picture 90 degrees in your head...
-
Your picture doesn't show where a "black wire" would be. A picture of the mysterious black wire would help a lot, I think. The picture you posted looks like the correct yellow sender wire, clipped on to the end of the sender, and protected by a rubber end. The rubber piece is on the outside already. not sure what's coming "out". Are you saying that the shiny black material is "rubber" and that the whole thing came out? That's not a stock piece then, I think. Not sure why there would be a wire left over either.
-
Grab the rubber end and twist it to break it free. Stick a wide screwdriver in between the edge of the rubber and the nut and twist it or push, to push the rubber off. It's factory stock and actually looks in good shape. You could remove the nut but the sender might still be stuck in the bore. And coolant will leak from the hole if you remove it. Use a pair of pliers on that rubber end and it will pop off. Don't pull on the wire. Just work it around until it comes off.
-
Or, if you can count to 4, you can just turn some parts and calculate. Let's not make the world too simple. Phones are softening enough brains already. If you're trying to be sure it's limited slip then pulling the cover is advised. Ratios - too easy.
-
He only has 4 posts and the last visit to the site was August 21. His youtube account hasn't had a video posted for 5 months. Looks like he tore it apart then got bored with it. Not uncommon.
-
There's a ground wire on the switch used for the dual pickup distributors. Your 78 doesn't have that. But after 40 years there's no guarantee that your car is still all 78.