-
Posts
2391 -
Joined
-
Last visited
-
Days Won
35
Content Type
Profiles
Forums
Blogs
Events
Gallery
Downloads
Store
Everything posted by Miles
-

Brake indicator switch rebuild
Miles replied to walkerbk's topic in Brakes, Wheels, Suspension and Chassis
year, make, model? -

the always troublesome rear spindle pin removal
Miles replied to bawfuls's topic in S30 Series - 240z, 260z, 280z
Another spindle pin video: -

Engine dies after medium throttle input
Miles replied to youztheclue's topic in Trouble Shooting / General Engine
Intake leak = lean sag upon opening throttle. Fix the leak first. Many many recent posts on the problem you are having. -
Move this thread to the suspension forum. He posted in the FAQ. forums.hybridz.org/topic/128915-new-bushings-car-is-sitting-too-high/?tab=comments#comment-1203946
-
Don't expect many answers as you posted in the wrong forum. There is a forum specifically for this question.
-

the always troublesome rear spindle pin removal
Miles replied to bawfuls's topic in S30 Series - 240z, 260z, 280z
Take it to a machine/suspension shop and have the pin pressed out. -
100 amp alternator for all of those electrical upgrades.
- 11 replies
-
- mods
- modifications
-
(and 2 more)
Tagged with:
-

the always troublesome rear spindle pin removal
Miles replied to bawfuls's topic in S30 Series - 240z, 260z, 280z
http://www.thezstore.com/page/TZS/PROD/23-4240 -

the always troublesome rear spindle pin removal
Miles replied to bawfuls's topic in S30 Series - 240z, 260z, 280z
HybridZ pin removal tool video: http://dirtys30.blogspot.com/2011/02/how-to-240z-spindle-pin-removal.html -

the always troublesome rear spindle pin removal
Miles replied to bawfuls's topic in S30 Series - 240z, 260z, 280z
You can rent or buy a spindle pin removal tool from a member on HybridZ or the company in this video. -
Contact Dave at the link I provided you. He rebuilds combo switches and has parts. He rebuilt my switches. Eventually my switch fell apart so I bought the last new OEM combo switch Black Dragon had for $300. Or buy up several old switches and rebuild one and keep one as a spare.
-
Need to be replaced. Trash them and start over. Many options available.
-

1972 240 brake problem Help Needed
Miles replied to Strongback's topic in Brakes, Wheels, Suspension and Chassis
Nice clean Z you have. -
https://www.datsun-240z-upgrades.net/services/ https://fiddlingwithzcars.wordpress.com/2012/12/04/turn-signal-repair/ Rebuild_240Z_combo_switch.pdf
-
Most likely a combo switch problem. He should rebuild the switch. I had a similar problem and found that solder joint had broken off the circuit board inside the switch. We have a member (Dave) who rebuilds the combo switches.
-

1972 240 brake problem Help Needed
Miles replied to Strongback's topic in Brakes, Wheels, Suspension and Chassis
-

1972 240 brake problem Help Needed
Miles replied to Strongback's topic in Brakes, Wheels, Suspension and Chassis
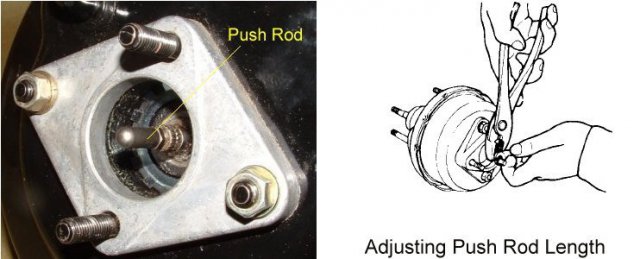
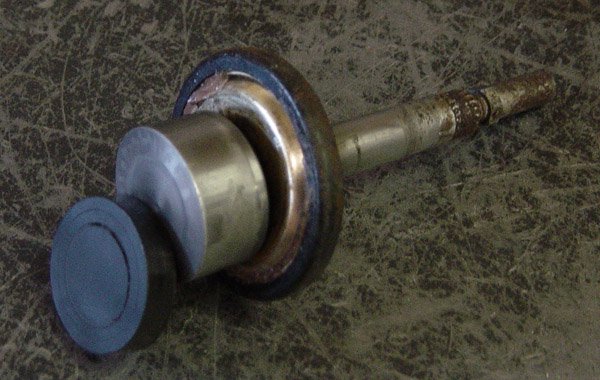
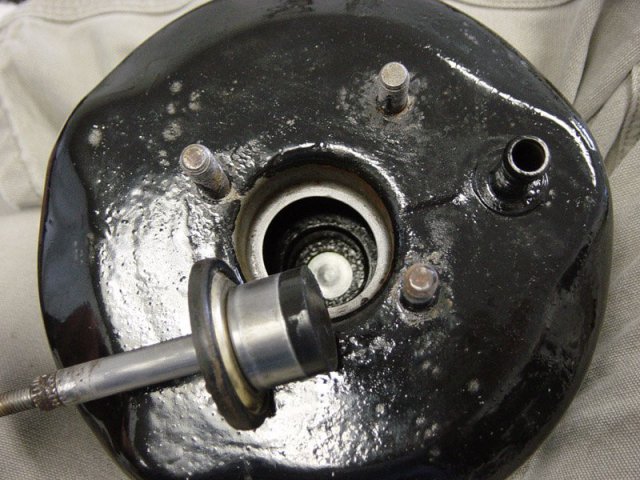
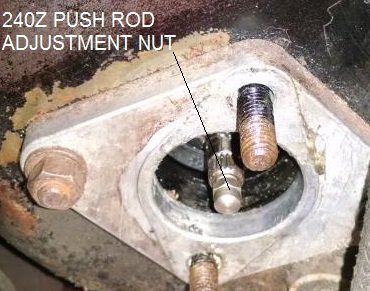
Before proceeding, check that your rear shoes are not worn out and or not adjusted. Per question 7, it is possible that the reaction disk has fallen out. It is a rubber disk about the size of a quarter and 1/4 inch thick and goes between the booster and the MC push rod. They typically fall out when people change the MC , try to adjust the push rod, pull the push rod too far out of the booster such that the reaction disk is pulled out of a pocket it sits in and falls to the bottom of the booster. Symptom: pedal travels almost to the floor and then the brakes grab really hard. Recommend that you search HybridZ. There is a post by a member that details this problem. It may be in the FAQ bake section or in the brake forum. Do your research and before doing the next step. You will need to visually confirm that the disk has fallen out. 1. You do not have to remove the MC for this. 2. Remove the nuts that hold the MC to the booster. 3. Do not remove the brake lines from the MC. Just pull it away from the booster and push it aside. 4. Remove the spacer that goes between the MC and the booster. 5. With a flashlight, look inside the booster where the push rod is. You will see a star shaped "keeper" that holds the push rod seal in place. 6. Carefully remove the keeper so you don't bend it. You may have to reshape it when reinstalling it. 7. After the keeper is removed pull on the push rod until it comes out. The seal will come out with it. 8 With a flashlight look at the pocket in the booster where the push rod sits. You should see a black rubber disk. If all you see is shiny metal pocket, then the disk has fallen out. Now you have a choice: 1. Remove the booster and shake it around until the disk falls out or 2. Buy a new booster as it will have a disk installed. Note if you pull the push rod out too far while adjusting the length per the FSM then the new disk will fall out. Recommend that you glue (JB Weld) the disk to the push rod, even on new units. Just orient the booster in a vise with the push rod pointed up vertically. Dig out the disk , glue it to the push rod and then replace the push rod, seal and keeper in the booster. This will save your mental heath when adjusting the push rod length. Your Z is over 40 years old. In the interest of safety, I always completely rebuild the brake system on old cars before putting them on the road. -
Have you done this yet? 4. More information is required when asking for help. Walk around the car with all of the lights on and report if any other lights are out. Why? Because the interior lights share circuits with other lights in the car. Tells us what you see. Just a guess, are the corner (running lights) lights not coming on?
-

1972 240 brake problem Help Needed
Miles replied to Strongback's topic in Brakes, Wheels, Suspension and Chassis
1. What, if any, modifications have been made to the brake system? Be specific. 2. Have you removed the master cylinder? yes / no 3. Have you replaced the booster? yes / no 4. Have you inspected the brake pads/shoes for wear? yes / no 5. Have you adjusted the the rear shoes? yes / no 5. Do you ever have to pump the brakes? yes / no 7. Is it like you have no brakes at all and then the pedal goes low and then the brakes grab really hard? yes / no 8. Do you know what a reaction disk is? yes / no 9. Do you know about the rod adjustment between the booster and the master cylinder? yes/ / no 10. Have you downloaded a copy of the Factory Service Manual (FSM)? Available on-line or in the forum marked "downloads here on HybridZ. You will need it. Answer all of the questions yes or no. -
Removing the dash can result in a bag of snakes on old cars. If you have to remove the dash for restoration/AC install/heater repair etc then you might as well go that route. All of the gauges can be installed with the dash in place.
-
Everything you need is here: http://www.zhome.com/ZCMnL/tech/autometer.htm Do a search as this has been covered many many times. You can remove the glove box (fragile) and reach behind the gauges. And/or you can remove the heater control panel to reach up from the bottom. If you have a dash cover installed you will not be able to get the old gauges out through the front of the dash. The Autometer fuel gauge will not read accurately without calibration. Calibration may or may not work!
-
You may want to go through all of the dash wiring and make a wire list in a notebook or excel spread sheet (see example). Basically what you need to do is document the wiring for current and future needs. You can use address labels that you number and cut to fit the wire. Loop the label around the wire and press the ends together. Take pictures after labeling and write down details in your spread sheet. Be sure to note what the wire does when energized. If you number a wire and don't know what it does, leave the function blank on the spread sheet and study the wire until you know what it does and then document it in the spread sheet. On my first 72 240Z, the PO cut/modified all of the engine bay wires. Using the above approach I corrected the wiring back to original function. From this point on I could identify every wire without a schematic. The attached wire list was for my V8 conversion. For each wire in the list I applied power and noted on the spread sheet what happened at each position on the ignition switch/other switches before disturbing any of the wiring. 240z Wiring Tag Numbers Table.xls
-

L.E.D hazard bulb issue...plz help!?
Miles replied to jersey280's topic in S30 Series - 240z, 260z, 280z
I bought my electronic flasher at Oreily autoparts. Plugs into stock plug and has a ground wire you attach under any nearby screw/bolt. Hotronics sells one with addjustable flash rate: http://hotronicsproducts.com/product_info.php?products_id=5&osCsid=88d51f29a4f6f034d7797b1ecbe8d9f6#.WuTBWbmWypo -
1. Don't just start removing parts without understanding the wiring for the lights. Just a waste of time and you might create a whole new problem. 2. Download a Factory Service Manual (FSM). It has a schematic and sections on the electrical system that you need to understand. Check Hybridz or Google it 3. Download a schematic for your Z. They are available on HybridZ and a number of other places on-line. Some members have re-drawn them in color. Check Hybridz or Google it. 4. More information is required when asking for help. Walk around the car with all of the lights on and report if any other lights are out. Why? Because the interior lights share circuits with other lights in the car. Clue: A bump followed by lights out. Could a plug in the wiring harness come loose? Tools required: volt meter and electrical schematic


