NewZed
Members-
Posts
6700 -
Joined
-
Last visited
-
Days Won
72
Content Type
Profiles
Forums
Blogs
Events
Gallery
Downloads
Store
Everything posted by NewZed
-
280z 1976 stalls after startup. Throttle body switch?
NewZed replied to Sjoost's topic in S30 Series - 240z, 260z, 280z
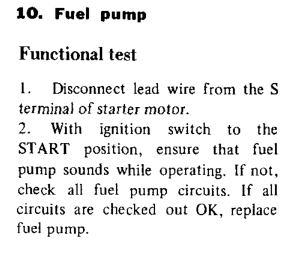
The EFI/fuel pump relay bypasses the AFM switch, for starting. So what you saw was normal. Disconnecting the starter solenoid wire and turning the key to Start is how Nissan says to test the fuel pump operation. Use it when you check the pressure. -
280z 1976 stalls after startup. Throttle body switch?
NewZed replied to Sjoost's topic in S30 Series - 240z, 260z, 280z
2.5 bar. 36.3 psi. Don't overlook something simple like a sticking or leaking injector. Or even bad fuel. If you don't drive it much the fuel in the tank is probably old. -
280z 1976 stalls after startup. Throttle body switch?
NewZed replied to Sjoost's topic in S30 Series - 240z, 260z, 280z
You said the engine runs but it runs poorly. Removing the water temperature sensor should make it so rich that it won't run at all. Different levels - runs well, runs poorly, doesn't run at all. You should at least hear a difference in the way it runs when you disconnect it. Which aftermarket pump? Some of them are high volume and might overpower the regulator. Did the problem occur immediately after changing fuel pumps? Basic troubleshooting rule is to undo what you just did if a problem appears. I found that any of the 1975 - 1978 ECU's would run my 76 engine. I had many spares that I had collected and tried them all. Whatever differences there are must be minor. I also had one ECU that went bad. First it just died while I was driving, it restarted a couple of times so I could get closer to home, then, apparently, it also started dumping fuel when I was trying to restart it and wouldn't start again. I replaced it with one of my spares and everything was back to normal. I never really figured out what was wrong with it. I changed a transistor in it and it worked correctly again but I never trusted it enough to leave it in. -
280z 1976 stalls after startup. Throttle body switch?
NewZed replied to Sjoost's topic in S30 Series - 240z, 260z, 280z
There have been discussions about what, exactly, goes bad in the ECU when they do go bad. The fact that disconnecting the water temperature switch has no effect suggests that that circuit is broken inside the ECU or at the ECU connection. You got the proper resistance measurement but the ECU did not respond when you disconnected it, suggesting that the ECU didn't "see" it. It should have had an immediate effect. If you can get it running, maybe try disconnecting the sensor at the engine while it's running to be sure there's no effect. If it works correctly it should go super-rich right away as soon as you disconnect it. Like you're in the Arctic. Good luck. The simple check is to swap in a spare ECU if you can borrow one. -
280z 1976 stalls after startup. Throttle body switch?
NewZed replied to Sjoost's topic in S30 Series - 240z, 260z, 280z
You seem to be saying that the idle circuit is causing the ECU to provide too much fuel. That the switch tested correctly but when you disconnected it, disabling the idle enrichment, it ran better. Disconnecting the switch would be like opening the throttle, but without actually opening the throttle. It might be that something else is causing it to run rich and disconnecting the switch makes things better but is not the true cause. Running very rich is one of the signs of the ECU going bad. Sometimes people find that it's actually the connections at the plug. They tap or beat on the side of the ECU or wiggle the cable to the plug and the problem gets better. The source is broken solder joints at the ECU connection. Try beating on the side of the ECU and wiggling the cable while it's running. Nothing should happen, if there's a change that's not right. -
original circuit/headlights no worky
NewZed replied to ferd289's topic in S30 Series - 240z, 260z, 280z
Not really clear what you did here. You said they come one when you give them power but you're asking about the ground side. Do they need power or do they need ground? Most headlight problems are at the dimmer switch as you mentioned. People have good luck by spraying contact cleaner down in to the dimmer mechanism and working the switch. Worth a shot. -
280z 1976 stalls after startup. Throttle body switch?
NewZed replied to Sjoost's topic in S30 Series - 240z, 260z, 280z
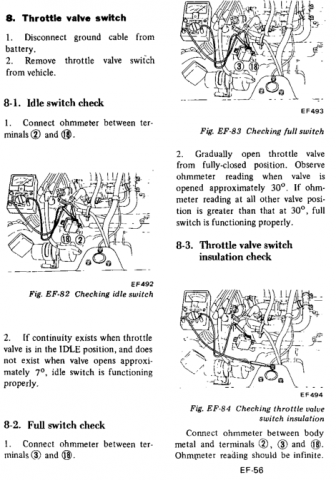
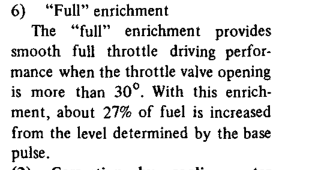
Did you check the throttle valve switch pins? There's a procedure. Sometimes they do get stuck on full throttle, they get dirty. That adds 27% extra fuel. -
Not clear who you're talking to. There are 16 pages in the thread. John Coffey died several years ago, but had already given the STI axle business over to Wolf Creek Racing before then. p.s. the R180 is not really strong enough for what you have. http://www.wolfcreekracing.com/index.php?option=com_content&view=article&id=22:tranny-a-rear-diff-parts&catid=16:tranny-a-rear-diff-parts&Itemid=31
-
Looks like fun. "Value" for who or what? Is it an investment for resale or are you driving it?
-
The two pronged sender on your 78 is a combined switch and sensor. Two devices in one. One prong is the switch for the relay and the other is the pressure sensor for the gauge. So you could use the sensor prong for the stick 78 gauge and leave the other disconnected. You don't need to buy a new sending unit. You might search the site and/or the internet for "ford inertia switch", it's a popular safety device around the modded car world. Although the Nissan design is better for mechanical malfunctions like if a fuel hose pops off and the engine stops running.
-
If the engine has been sitting it might be that the valve stems are gummed up or have surface rust. They stick, the cam lobe keeps going, and the rocker arm doesn't have any pressure on it to hold it in place. If it was mine I'd just keep the RPM down for a few hundred miles to let things wear back in. Although that's not what I did when I got my old had-been-sitting car. See if the wipe pattern looks the same after you reinstall them.
-
Check the simple stuff like the air intake. Make sure the throttle blade is opening completely. Check the intake system for mouse nests, they work fast. Make sure the filter is not clogged. Take the black cover off of the AFM and make sure the counterweight/vane is moving freely as you rev the engine. The AFM vanes have been known to bind. The only thing stopping an in-tune engine from revving and producing more power is air flow. Your symptom sounds kind of like an air flow problem.
- 8 replies
-
- 1
-

-
- compression
- camshaft
-
(and 2 more)
Tagged with:
-
I don't see spark plugs, distributor cap, rotor. Usually the first tune-up parts people think of. Here are some things to check that might offer a clue. Is the transmission shifting through the gears as you accelerate to 30 mph? What is the tachometer needle doing? Is it behaving normally, following engine RPM, or does it jump around? Do you think that the engine is running well, besides the lack of power? In other words, does it sound smooth or does it sound like it is missing or stumbling as you try to accelerate? Give more details on what, exactly, the engine itself is doing as you try to get to 30 mph and what happens when it stops accelerating as the speedo needle stops climbing. What is the transmission doing? Do you think it's functioning properly? Engine noise and tachometer needle are good indicators of engine performance. Exhaust smell is also a clue. There are two common problems with the old cars, the ignition module and the ECU. The ignition module will typically start shooting too many sparks when it goes bad and the tachometer needle will start acting weird. and the engine will run poorly. The ECU's tend to run very rich as they start to go bad, causing a very gassy smelling exhaust, then they die completely. To rossman's point, if your timing is retarded the engine will be way down on power. But if it started running poorly before you adjusted timing you'd have to wonder how the timing got retarded, unless something broke in the distributor. One way to check if your damper has slipped is to match the notch and groove on the timing chain sprocket and see if you're close to zero on the timing mark. There's a bunch that ran through my mind... If the engine is running well, it might just be your transmission. Try using the shift lever to stay in the lower gears and see if things are different. Separate engine issues from transmission issues.
- 8 replies
-
- compression
- camshaft
-
(and 2 more)
Tagged with:
-
#2 is low but it's within spec range, 10%. The engine should run fine just with maybe a lumpy idle due to the imbalance. You should definitely be able to go faster than 30 mph. The red on the camshaft is just factory paint, it has no meaning. Your rocker arm play is normal, the lobe was on the base circle (off the lobe), with no pressure on it. The others probably all do the same. Is it a manual or an automatic? When did you last give it a tuneup? Do you drive it often? Is it possible that there is water in the fuel tank, from sitting long periods between driving? Doesn't seem like a major engine problem. Probably some minor electronic or fuel problem.
- 8 replies
-
- compression
- camshaft
-
(and 2 more)
Tagged with:
-
You said you wanted it to rev higher. Where is your cam timing? Did you degree the cam to Schneider specs when you installed it? You can move the powerband higher by changing cam timing. Cam timing affects "breathing". https://help.summitracing.com/app/answers/detail/a_id/4706/~/advancing-%2F-retarding-a-camshaft#:~:text=A Basic Overview of Cam,the camshaft and the crankshaft.&text=Advancing or retarding the cam,other of the crankshaft centerline. https://www.jcmmachineandcoatings.com/understanding-combustion/degreeing-a-camshaft/#:~:text=Degreeing the Camshaft-,What is Meant by Degreeing the Camshaft%2C and Why is,that their rotation is synchronized. http://schneidercams.com/284-70F-14_LET6.aspx
- 15 replies
-
Cam timing generally determines where the torque power curve is, high or low on the RPM range. Did you do all of this work yourself or have some help? There's some odd things in the overall story. No offense.
- 15 replies
-
Looking for a mag sytle lug nut with a short collar
NewZed replied to tokuzumi's topic in S130 Series - 280ZX
Gorilla has good stuff on their site and seems to make a good product. You can find them in the auto parts stores, on the shelf. Read this page and you'll see that hole size is not the issue. Yours have a specific seat style. Wheels either locate through the seat, or by the shank. Shanks require a precision hole. The others require a precision seat. https://www.gorilla-auto.com/gorilla-tech-tips -
How to remove connector from junction block?
NewZed replied to Witchboard's topic in Ignition and Electrical
That assembly seems to be meant for permanence. It's not really meant to be unplugged. People that have had success have had to devise small picks and thin blades to get past the locking mechanism. In other words, you'll need to do your best Macgyver. Here's an old post about it, if this is the one you're talking about. Read this one and a couple more below it. https://www.classiczcars.com/forums/topic/60007-78-280-re-assembly/?do=findComment&comment=549453 -
I did a Google and found this. I'd wait and confirm. One's from Hybridz. Not looking good. https://zilvia.net/f/showthread.php?t=50158 https://www.google.com/search?rlz=1C1SQJL_enUS862US862&sxsrf=ALeKk012kyI3OARbRxjn53vqXgsMBXC7CQ%3A1605209360066&ei=EI2tX8fJA9ba-gTFpY7gCQ&q=S15+Helical+LSD+spline+shaft&oq=S15+Helical+LSD+spline+shaft&gs_lcp=CgZwc3ktYWIQAzIFCCEQoAEyBQghEKsCMgUIIRCrAjoECAAQRzoHCCMQrgIQJzoICCEQFhAdEB46BwghEAoQoAFQhT1Y4FFgoVNoAHACeACAAWyIAe4IkgEEMTEuMpgBAKABAaoBB2d3cy13aXrIAQbAAQE&sclient=psy-ab&ved=0ahUKEwjHkcnt3v3sAhVWrZ4KHcWSA5wQ4dUDCA0&uact=5
-
I think that the exhaust manifold with the turbo flange, and the J pipe to take the pressure to the manifold are the two items that are specific to the L28. The rest can probably be pieced together on the aftermarket. That's for EFI. Good stuff here: https://forums.hybridz.org/forum/90-l-series/ You can buy kits: https://www.cxracing.com/turbo-kit-nissan-datsun-240z-260z-280z-s30/turbo-kit-nissan-datsun-240z-260z-280z-s30-l28-l28E/TRB-KIT-IM-L28-280Z-NOIC Search words: https://www.google.com/search?q=datsun+turbo+kits&rlz=1C1SQJL_enUS862US862&oq=datsun+turbo+kits&aqs=chrome..69i57.4700j0j15&sourceid=chrome&ie=UTF-8 Carbs: https://www.google.com/search?rlz=1C1SQJL_enUS862US862&sxsrf=ALeKk01dUEG8FNHFMFvFit0jQT5xA-aymg%3A1605129681122&ei=0VWsX9XvBqrP0PEPw7iZqAU&q=datsun+turbo+kits+carb&oq=datsun+turbo+kits+carb&gs_lcp=CgZwc3ktYWIQAzIICCEQFhAdEB4yCAghEBYQHRAeMggIIRAWEB0QHjoECAAQRzoJCAAQyQMQFhAeOgYIABAWEB5QgKwPWN-1D2Ctug9oAHACeACAAWSIAdYDkgEDNC4xmAEAoAEBqgEHZ3dzLXdpesgBCMABAQ&sclient=psy-ab&ved=0ahUKEwiVnNiDtvvsAhWqJzQIHUNcBlUQ4dUDCA0&uact=5
-
Window Bumper Rubber Location?
NewZed replied to Witchboard's topic in S30 Series - 240z, 260z, 280z
77 and 78 have a very different style window and door. Might be that zcardepot just assumed they were all the same. What is that actually stops the window, at the bottom of its travel, on your car? That might be the clue. -
Anything from 77 to 83 ZX will swap right in as far as 5 speed. If you get a mid-80 to 83 5 speed you'll probably want the 3.9 diff also. And a 76-78 propeller shaft. Your 75 should have the unique bolt pattern diff flange and propeller shaft. Any engine up to 1983 will swap in . I had good luck just buying a whole car that had been sitting for years. If you have the space you can save a lot of money that way.
-
This might be simpler and faster than a crank-mounted wheel. Several good articles on the web site also. https://www.diyautotune.com/product/54-mm-optical-trigger-wheel-for-nissan-l28et-or-vg30e/ https://www.diyautotune.com/support/tech/hardware/nissan-trigger-disc/ https://www.diyautotune.com/support/
-
People have taken those apart and cleaned them up with success. The contacts don't burn up they just get gummed up. Many people, myself included, have fixed them just by spraying large amounts of contact cleaner in to the assembly and working the mechanism. Not lying. Many people who buy a Z that has sat for years find that they don't have headlights or they only have high or low. It's probably just a light film of corrosion and a weak spring in the mechanism that can't push through it.


