Miles
-
Posts
2393 -
Joined
-
Last visited
-
Days Won
37
Content Type
Profiles
Forums
Blogs
Events
Gallery
Downloads
Store
Everything posted by Miles
-
Did you write 260Z? End
-
Buy this manual if you are going to own a hybrid Z: http://www.jagsthatrun.com/Pages/Datsun_Z_V-8.html The JTR manual has a section on transmissions commonly used in 240Z V8 conversions. The JTR manual will answer many of your questions. You will have to install a stock 240Z clutch pedal assembly. Go to the Driveline forum and spend at least two weeks researching transmissions, clutches, master cylinders, slave cylinders etc. This will help you make an informed decision and to ask the right questions later. I have T5 WC transmisions in both of my 240Z V8 projects for over ten years and never had a problem. Transmission choice ultimately depends on how you will use the car. You could save some work and swap the 350 turbo for a 700R4 automatic as well since you are already set up for an automatic.
-
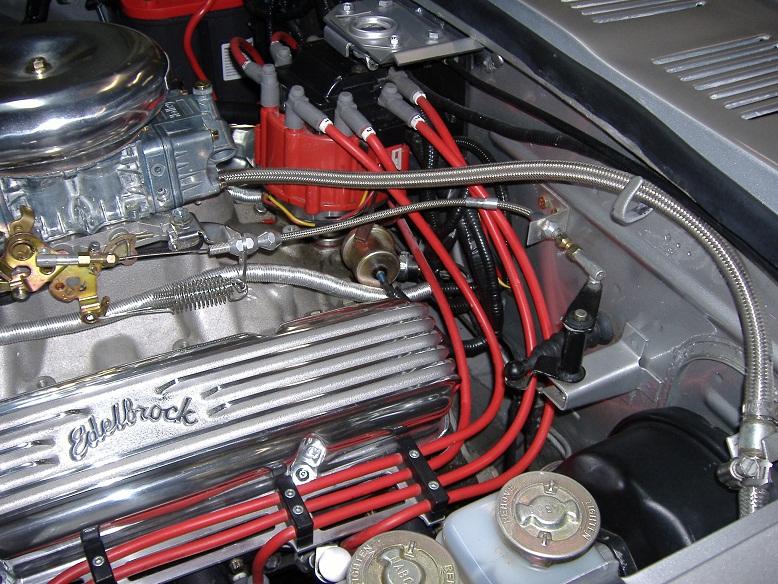
If the cable has frayed inside of the sheath lube will not help. Find out why the cable is fraying and replace the cable. The cable may be binding and rubbing on the sheath end which will cause the cable to wear braking the cable strands. Eventually the broken cable strands will catch and bind the cable inside the sheath. Is the cable lined up with the gas pedal attachment point? This happened on my first 240Z project which is why I now connect a short cable to the factory bell crank as shown in the picture above. Also, when you post provide more information: year, model of car, engine and trans used.
-
Stuck throttle stories: http://forums.hybridz.org/topic/10126-z-yas-motor-and-tranny-hurt/
-
Try this throttle set up. Very smooth and trouble free.

-
The first thing you should do is buy the JTR book and read it several times. http://www.jagsthatrun.com/Pages/Datsun_Z_V-8.html The second thing you should do is spend at least a month reading the section on SBC V8 swaps. The third thing you should do is make a plan with a spread sheet identifying all of the parts and costs that make up your plan. The JTR book assumes that the reader has basic auto mechanical/electrical skills. These are 40 year old cars so expect that there will be problems other than the just the engine swap along the way. If you are new to engine swaps you may want to just keep the car stock for now and make it a reliable daily driver.
-
There is one position that the rollers will interface the rails. Just keep adjusting the position of the rollers with the hand crank until everything matches up. Once you see that it is easy. Also, do a search here and at Classic Z Car as I recall threads that advise how to do this.
-
Did you even search? There must be over a hundred threads on carpets. Such as this one: http://forums.hybridz.org/topic/98194-pictures-of-different-carpet-kits/?hl=carpet Spend a few hours looking at old threads. You can also do a search at Classic Z Car
-
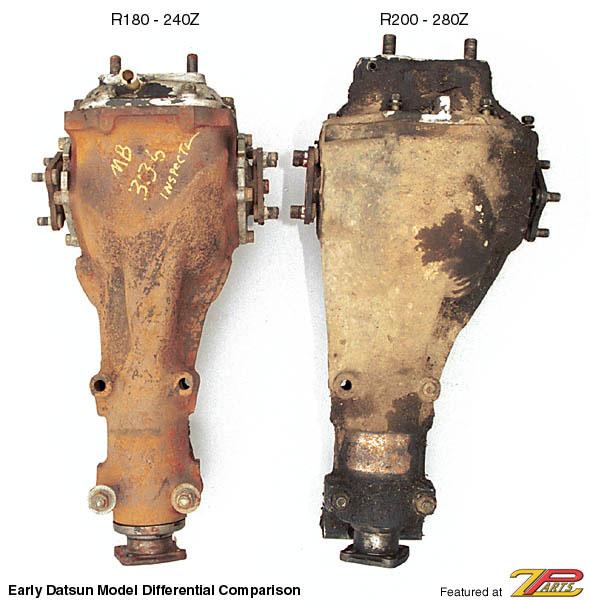
See picture for side by side view of R180 and R200. For more information do a Google search: site: hybridz.org R200 or R180 etc. etc. etc. You should get a ton of hits. Or do a Google image search for Datsun R200 etc. etc.
-
Go here: http://www.zhome.com/ZCMnL/tech/autometer.htm Tells how to install 2 5/8" Autometer gauges in a 240Z. Many how-to threads on HybridZ and Classiczcar too.
-
do a google search: site: hybridz.org gauge size or gauge install etc
-
His name is Dave and he is also a HybridZ member as well: HLS30-08077 Typically, the turn signal switch just needs cleaning and adjustment of the copper contacts inside. Do a search as it has been discussed many times and there are several "how to repair" the turn signal switch threads. If the HybridZ search doesn't return any hits do a Google search in this format: site: hybridz.org turn signals You should also search at Classic Z Car
-

280ZX rear caliper Race Pad?
Miles replied to duragg's topic in Brakes, Wheels, Suspension and Chassis
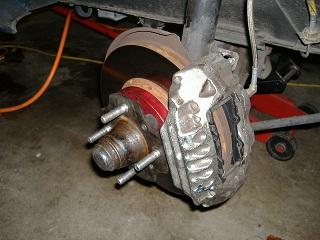
I tried Porterfield RS4 pads on my 240Z (Toyota vented front, 240SX rear brakes). Even though they are street pad, they didn't have enough cold bite for street use. Even after making a number of "warming stops" they still didn't do well on the street. By the way, I could never get the Toyota S12W vented and 240SX rear brake setup balanced. The rear 240SX calipers (similar to 280ZX) can not keep up with the S12W vented front brakes. It is a known problem discussed many times in the brake forum. Research this before you pull your drums off and change the master cylinder etc. I have since gone back to stock front brakes with the 240SX rear calipers using Hawk HPS pads (Hawk Blues) front and rear. The Hawk HPS pads have good cold bite and I don't have to heat them up. They are a bit more dusty though and they are quiet. -
Install a Painless electric fuel pump relay kit with the relay inside the car (passenger footwell or toolbox). Unplug and remove the relay when parked.
-
240z S12W stock 14" or 15"?
Miles replied to KoolMan's topic in Brakes, Wheels, Suspension and Chassis
With my 15 in. American Ansen racing wheels I had to install longer wheel studs and use spacers so that the wheels would clear the fins on the S12W caliper. Unless you are racing where heat is a problem the S12-8 solid or stock front brakes are fine. Suggest you do more research in the Brake and FAQ sections as this topic has been discussed extensively.
-
rear suspension issue?
Miles replied to AZGhost623's topic in Brakes, Wheels, Suspension and Chassis
Another possible source of Z parts is Eric Neyerlin at http://www.zparts.com/home.html -
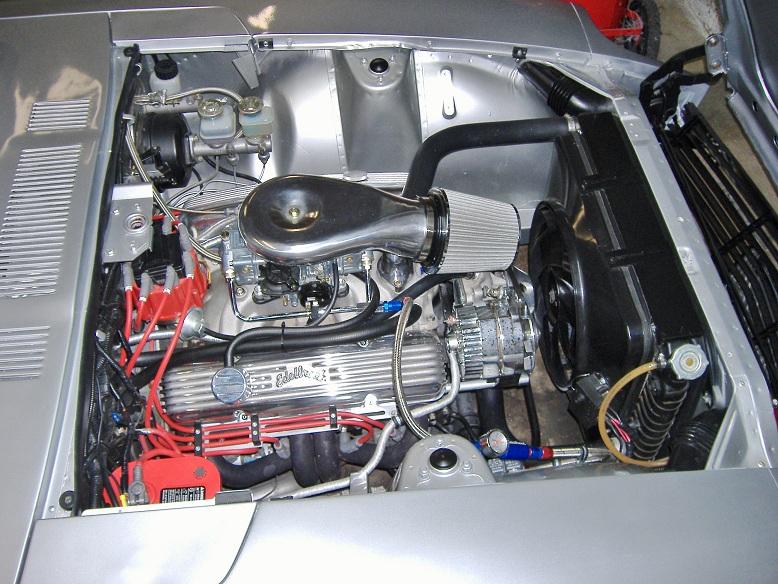
Typical SBC install.
-
rear suspension issue?
Miles replied to AZGhost623's topic in Brakes, Wheels, Suspension and Chassis
Look here: http://www.thezstore.com/page/TZS/CTGY/SSSC01A02 -
Clicking noise from under the dash
Miles replied to jakez's topic in Trouble Shooting / General Engine
FSM here: http://www.xenons30.com/reference.html Buy a Haines manual as well. You are not providing enough information to diagnose the problem. Study the problem, read the Haines and FSM electrical sections. Get a helper and go under the dash and listen for where the clicking is coming from while pressing the brake. Identify the part that clicks. Why would it click when pressing the brake? Is it tied into the brake light circuit? What component(s) does the brake light circuit pass through? etc. etc. This will be a way of life as long as you own an old Z car. end -
Most of what you want to know can be found in the tech section of http://zhome.com/ List of datsun differential ratios Method for determining ratio of differentail
-
Clicking noise from under the dash
Miles replied to jakez's topic in Trouble Shooting / General Engine
Need to tell us the type of car when you post questions. There are a number of relays under the dash including the turn signal flasher. Just a hunch. Do all of your turn signals and lights work? Look under the dash. Anything clicking there? -
google image search
-
Blinker and brake light problem (new video)
Miles replied to zeiss150's topic in S30 Series - 240z, 260z, 280z
Good video. Most how-to videos aren't. I keep two or three repaired combo switches around for quick change out when my lights start acting up. Use a white towel as a work surface. The small parts show up easy when dropped on the white towel and they don't go bouncing into the Land of the Lost. -
Blinker and brake light problem (new video)
Miles replied to zeiss150's topic in S30 Series - 240z, 260z, 280z
Use a small blob of grease to hold the ball bearing and spring in place while re-assembling the switch. In addition to cleaning the contacts, sometimes they will need to be bent slightly to make good contact. -
The best way to approaoch this is to make a sketch of how the oil pressure switch is wired. Name and color code each wire. If you are going to use a fuel pump relay add that to your sketch. Use a Painless Fuel Pump Relay kit. Have you tested the Black-Blue and Green-White wires with a volt meter? As you turn the ignition switch how does each wire behave? Fuel Pump Relay: run the output of the oil pressure switch to the trigger wire of a Painless Fuel Pump Relay. The painless kit comes with long wires so you can run the trigger wire to the oil pressure switch. Look at a schematic for a 260Z as there may be an unused Green wire Datsun installed to run an electric fuel pump. The Green wire is taped up near the fuel level sensor. Inside, you can find it behind the passenger side kick panel. It continues to some point near the fuse box. If it is there you can connect it to the output side of the Painless relay and to your electric fuel pump.