cgsheen
-
Posts
676 -
Joined
-
Last visited
-
Days Won
9
Content Type
Profiles
Forums
Blogs
Events
Gallery
Downloads
Store
Everything posted by cgsheen
-
Awesome.
-
Sorry, we're not currently selling the camber plates seperately. I'll PM you about weld-on adapters.
-
Thanks for the heads-up Ryan. What did you use to access the site? Just looked it all over on my Desktop and couldn't spot a problem using IE. I'll PM you. I'd appreciate info like this in a PM rather than adding to this thread.
-
Geeez... Buy it. Just keep it out of that Utah Winter and off those salted roads. When you get it running, take it up through my old Home Town - Idaho Falls - then up the back way to Jackson Hole. You know how to get back to Logan from there...
-
Currently finishing development. These will be available very soon!
-
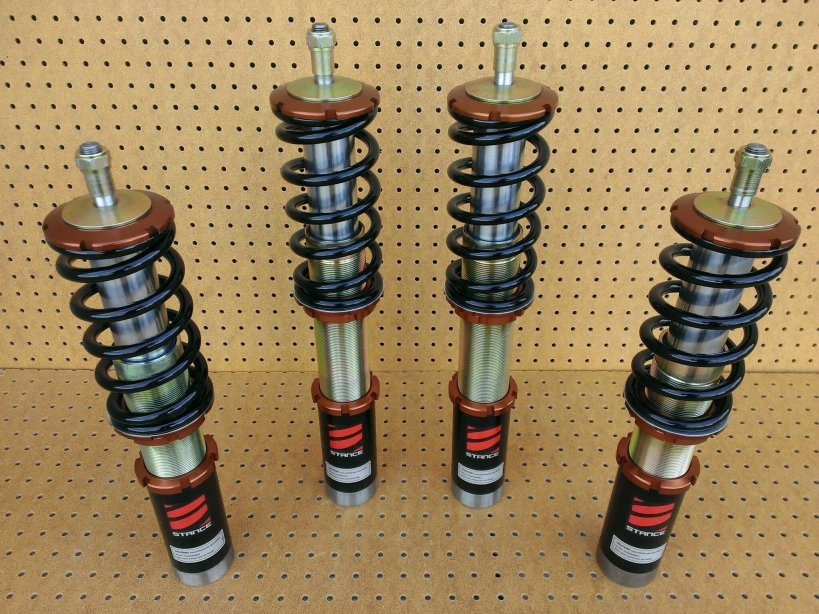
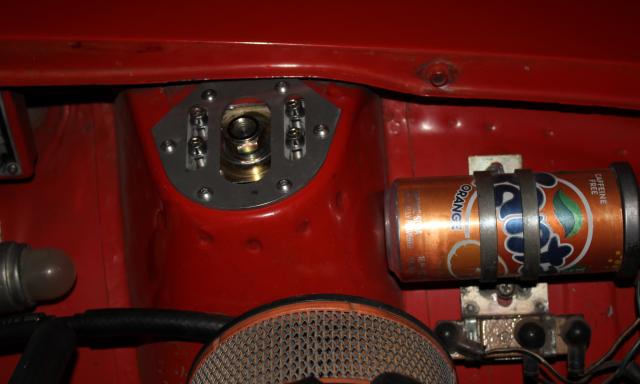
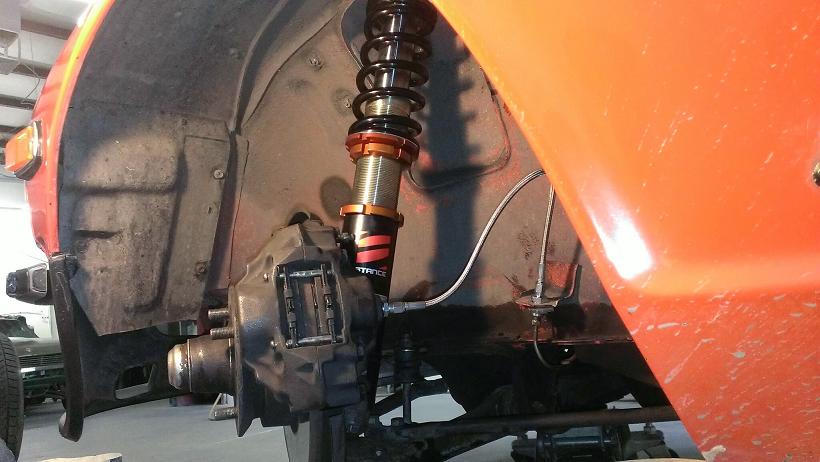
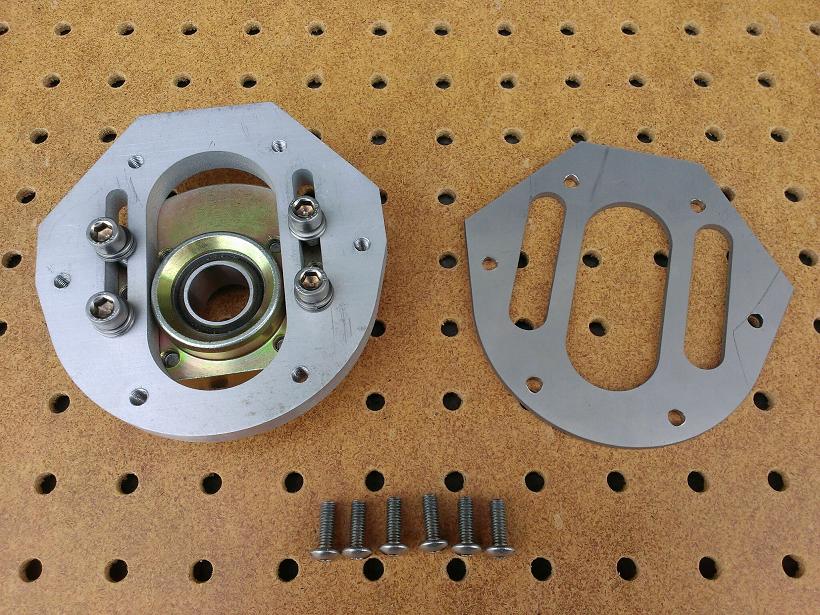
Sakura Garage is pleased to announce the availability of the Stance USA fully adjustable coilover set for the 240Z, 260Z, 280Z. See our website: http://sakuragarage.com/products/datsun-suspension for order information. - We use Stance USA Super Sport inverted struts. (No hood clearance issues) - Your choice of spring rates. - Swift Springs are also available as an option - Weld-on adapters included - with proper size and length for 240Z or 280Z strut configuration. Our kit allows a wide ride-height adjustment range** - from stock ride height to - well - dirt-nasty-low... We've also developed a bolt-on Camber Plate* for use with the Stance USA coilovers. Our camber plates allow the maximum possible adjustment range in an S30 strut tower! Included templates for drilling and cutting strut towers Drilling template uses stock top hat holes for proper alignment every time Cutting template assures you remove only what's needed to install camber plate Our stainless steel top plate (vanity plate) gives every installation a professional look Please note - this coilover kit requires: - cutting your stock strut tubes - welding the threaded adapters to your stock suspension - the bolt-on camber plates require cutting some material from your strut tower $1595 + shipping with camber plates $1295 + shipping without camber plates (modification must be done to stock top hat) * The camber plate is bolt-on but still requires some cutting of the strut towers to allow for installation of the camber plate and movement of the pillow ball for camber adjustment. ** Our primary focus is to give you a high-quality upgrade with full adjustability to give you maximum suspension performance for your dollar. But if your primary focus is low - you got it...

-
OMG...
-
Probably better to use the GM HEI Ignition Module. It's a nice, cheap, readily available, cheap, readily available, easy-to-do replacement for the stock Ignitor. Plenty of threads that'll tell you how to wire it up and everything you need is right there at the coil. If you don't want to go the $25 GM HEI route, I have an L28ET Ignitor w/ bracket. Known good - removed from my Z when I did the M30 ECU swap. It can be picked up with the turbo I have for you.
-
Fairly simple, but you'd need a turbo distributor and a turbo drive spindle. The end of the shaft is different between the N/A and turbo distributor and their spindles. (I'm taking about the shaft that runs between the oil pump and the distributor and drives them both...) Go to the Megasquirt part of this Forum and find out if there's a reason to change. Better to know why it is the way it is. Those parts will be $$ unless you can find them at a yard or from someone who doesn't know what they are and how many people are looking for them...
-
Ya, but the 260-280 dash (& ducting & firewall) was designed for A/C and factory installed Air was an option here in the U.S.A.. Here in the U.S.A., the 240 didn't have a factory installed A/C option - that's always been the conundrum... If your 260 / 280 didn't come with factory Air, it's always been far easier to install an aftermarket unit than in a 240, here in the U.S.A.. edited to be Internationally correct and not so damn America-centric... Thanks to Tony D for pointing out the error of my mistake again on this point.
-
And, of course, the Z isn't the only Nissan vehicle that used this handle or that plastic part. Further, that particular handle (or door mechanism) isn't the only one that uses that, or an extremely similar, part. You'll find something like it on most every door mechanism that uses a rod. Plenty of Nissan's South of the Equator aren't there?
-
(75 280z) Idler Pulley Replacement problem
cgsheen replied to Zmanj87's topic in S30 Series - 240z, 260z, 280z
The best way is to press it out but most of us don't have access to that equipment. The way it mostly gets done is: find a pipe or large socket that's about the same size as the outer ring of the bearing. The side of the adapter shown in photo number 1 has to fit inside the pipe or socket in order for this to work. Place your bearing assy on the pipe or socket the same way it sits in photo number 2. Now you take a punch (drift, socket, pipe) - (anything that's same size or just smaller than the adapter) and tap it out of the bearing. Try not to deform the adapter. You're going to keep that smaller center piece and press it into the new bearing. -
Hatch hinge flange angle?
cgsheen replied to Atozone Tonine's topic in S30 Series - 240z, 260z, 280z
We have this hatch off a '72 240Z in the shop. The "inside" angle appears to be exactly 135 degrees (90+45) on the hinge bracket. -
We always start at the top of the glass - personal preference I think... (easier to hold the bottom in place than the top for us) As you get the rubber over the flange it helps to pull it outboard and really set it over the flange. Once I've got 10 or 12 inches of rubber over the flange I reach underneath with my fingertips and pull (squeeze) the seal to the outside. That also helps the seal and glass to drop into the hole. Keep pushing the glass and seal down (and out) as you go. Your gaps at the corners are most likely caused by two things (other than repro rubber that's not quite right..): A. Not pulling the seal outwards enough B. Not having the stainless steel trim in. The trim is for more than just looks - it actually really helps keep the edges of the seal pushed out and in the correct position to cover the corners. Especially the bottom corners of the hatch and the top corners of the windshield. You can "massage" the rubber quite a bit. It's not always easy, but you can push and knead and stretch and pull - inside and out - to get the gasket moved to where you need it to cover gaps and get the outside edge (flap) to sit flush and smooth on the body. If you're the guy pulling the rope (string, cord, wire, whatever you use) you really do need a good pair of gloves to save your hand. When you get to the corners (especially the tight-turn corners), start working the cord in a circular motion. The guys helping hold the window in place will think you're nuts, but motion of the cord really helps pull that tough-to-get corner material out and over the flange...
-
Right. It really requires having a helper to hold the glass in place. While you're trying to get one side set, it tends to "push out" the other side unless someone is holding it in place... We have very good luck using a smooth, supple cotton cord that's nearly 1/8" thick (like "clothes line" rope from back in the day). +1 on installing the stainless steel trim before you put the glass in the hatch (same goes for the windshield). It's infinitely more easy than trying to put it in the channels once the glass is set. I think the entire process is described very well in the Factory Service Manual.
-
Then you're looking at the "EFI" section of the FSM and not the "ECCS" section regarding the TPS. The turbo TPS is a 2-wire, single switch. It only "looks for" ON or OFF idle condition. The turbo ECU does not use the WOT switch (even if it's present). That's why only 2 wires in the stock turbo harness.
-
Or http://www.nicoclub.com/datsun-service-manuals ... Many people with early EFI Z-Cars are under the mistaken impression that it's really a "position" sensor - like new cars. All it actually tells the ECU is if the throttle is ON or OFF Idle and in some cases if it's Wide Open (WOT). No other position is sensed. On the turbo motors, it's just ON or OFF throttle - there's not even a WOT...
-
shielded wire for distributor
cgsheen replied to wickiewicked240z's topic in Ignition and Electrical
18/4 AWG Shielded works just fine - been using it for nearly 2 years for my CAS signal. I made an entirely new harness when I changed to the M30 ECU and that's what I used. All the way from the distributor to the ECU. -
http://www.nicoclub.com/datsun-service-manuals There too...
-
I think you'll eventually regret keeping the stock harness. A new EMS deserves a new harness IMO. I'm super glad I did it that way when I moved to a non-stock ECU. The old harnesses were never meant to last this long. The wideband sensor will screw into your stock downpipe in place of the O2 sensor - the Innovate stuff usually comes with a weld-on bung and/or they sell the bung for $5.00 so you can mount it elsewhere if need be. The auto parts store has a new Cylinder Head Temp Sensor for $20 - just a thought...
-
We just did that to our '72 240 in the shop. Our first foray into cutting an entire roof off a donor, drilling all the spotwelds, melting the lead at each pillar, cutting the welds at the corners and separating the roof skin. Not for the faint-of-heart, but definitely do-able. The right tools help. And, there are some great guides by guys who paved the path. Bone up on everything required and which side to drill spot welds on which piece. You can have a replacement roof that almost looks like the factory installed it. They're right that a "patch" is extremely difficult to get right.
-
I have the stock AFM, ECU, and injectors from my Son Nick's '76 L28E. If you're ever near the shop, stop by and grab them. Hit me up first and I'll make sure they're all in one place. If any of them work for you, you can tell me what it's worth...
-
Well, Phoenix has everything from bargin basement to luxury resort - you won't have any trouble finding accomodation. Tons of things to do depending on what you're interested in. I think some of the Desert Datsun guys would love to meet you if you have time to hang out for an hour or two while you're in town. If you need some route suggestions, hit us up. You can Freeway travel or if you want to take some 2-lane, there's some really beautiful drives from the Canyon to Sedona. If you've never been to this part of the Desert, we have some mountains that may surprise you. Have a wonderful drive and enjoy the weather down here.
-
So not true. I'm actually amazed at the number of parts you can still get from Nissan for these old machines. Must be one lazy-a$$ parts counter dude... It helps if you have part numbers - which you can get online. And, there are a few Nissan dealerships that cater to Datsun enthusiasts so they have a bit more experience, but my local dealer has been very helpful finding parts for me.
-
This is the method I've had a great deal of success with: The theory is - if you can get the spindle pin to turn, you can get it to slide out. First off, it'll never hurt to remove the retainer pin (bolt), plug the bottom hole, and fill the top hole up with your favorite penetrating oil solution. Take the nuts off the ends and apply penetrating oil there too - for as long you can afford to let it sit, reapplying as needed... Now for the turning part: The threads on the spindle are exactly the same as a Datsun (Nissan) lug nut. I save the original nuts and use a couple of old lug nuts on one end of the spindle. With the lug nuts locked up, try to turn the spindle. I use an impact wrench. Otherwise a big ratchet (or ratchet with a cheater) - or, more likely, a breaker bar - use you own favorite turning device. If it'll turn, you can most likely drive it out. Once it turns, tap on the other end and see if it'll move. I always protect the ends with nuts over the threads - again old lug nuts work well here. Then I'm tapping on the face of the nut, not the end of the spindle. Or, when using a drift, a nut slightly off the end provides a "cup" for the drift and keeps the drift from going off one side and nicking the threads... If it won't move with tapping, go back to turning it. If need be, get some one else to turn the spindle while you tap the other end. A nut on the end will only let you go so far, then you'll need to remove it and start using a drift to push the pin all the way out. With this job, patience really is "the key to joy" - as a fortune cookie once told me... I've found in every spindle I've pulled that the retainer pin (bolt) has slightly deformed the spindle pin in some way. Usually very slightly, but the pin is pretty high tolerance and even a slight bulge will have a dramatic effect. Try it yourself: Once it's out and cleaned off a bit, put it back in and see where it "catches". Mine have always slid back in fairly easily until it gets to the notch in the pin that the retainer mates with. Finding the "bump" and filing it off has always made the pin easier to reinsert and position correctly for the retainer bolt to go back in. Leads me to believe that installing and torqueing the retainer bolt properly may be more important than you would think.