Leaderboard


Popular Content
Showing content with the highest reputation since 06/18/26 in all areas
-
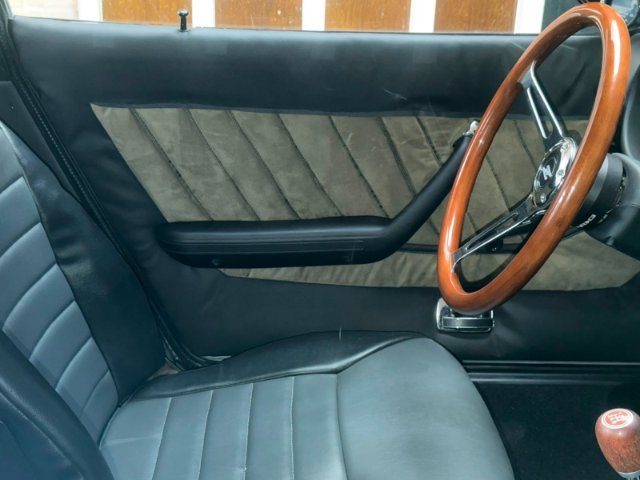
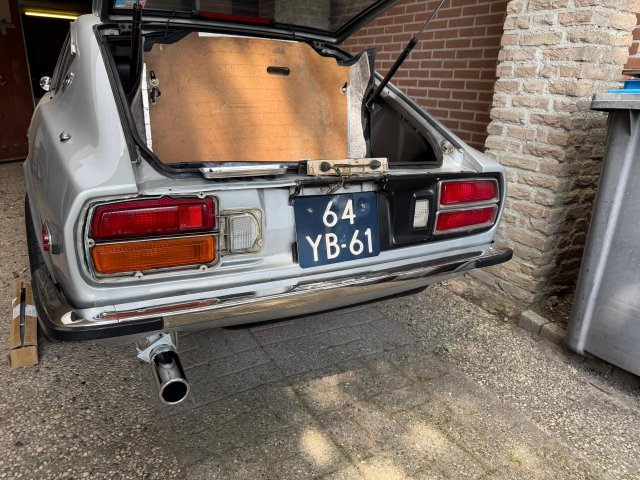
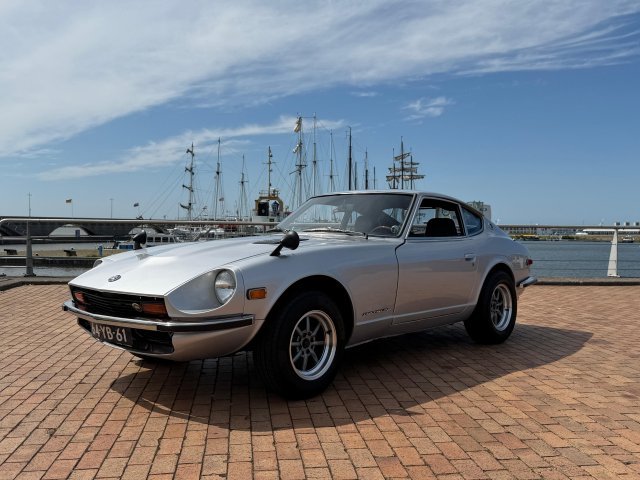
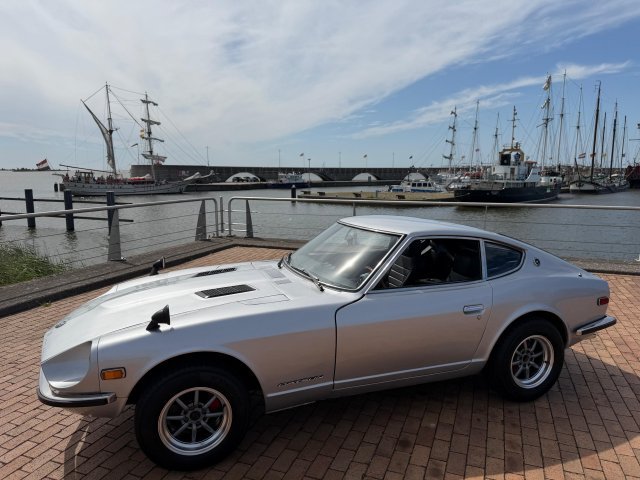
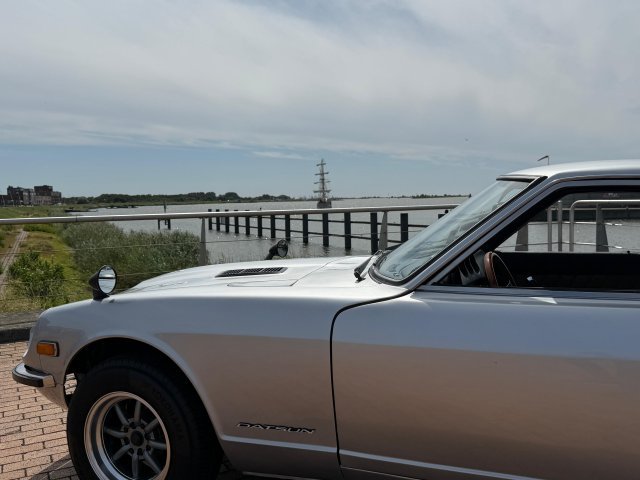
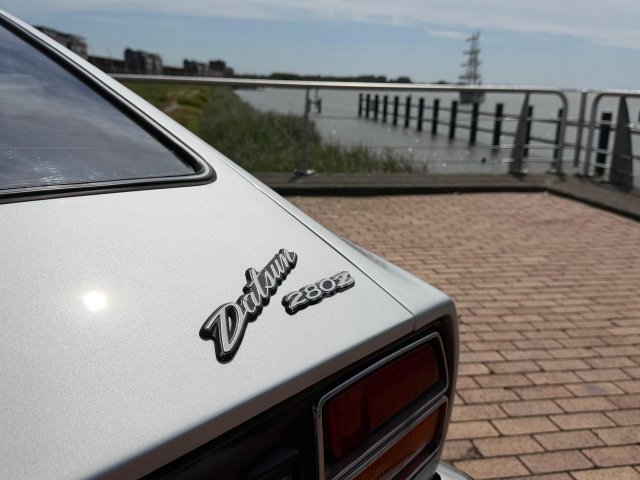
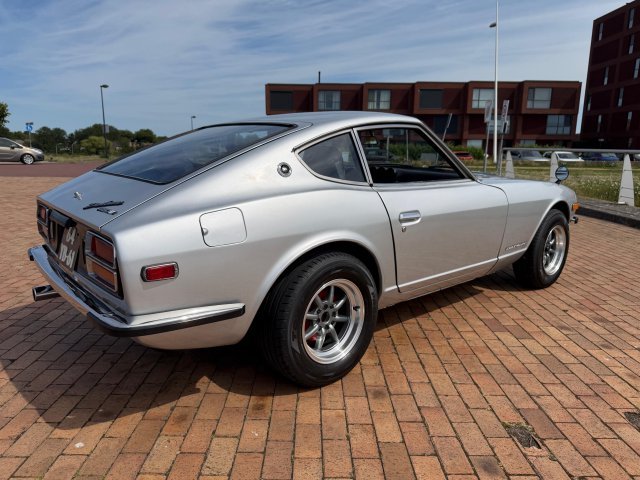
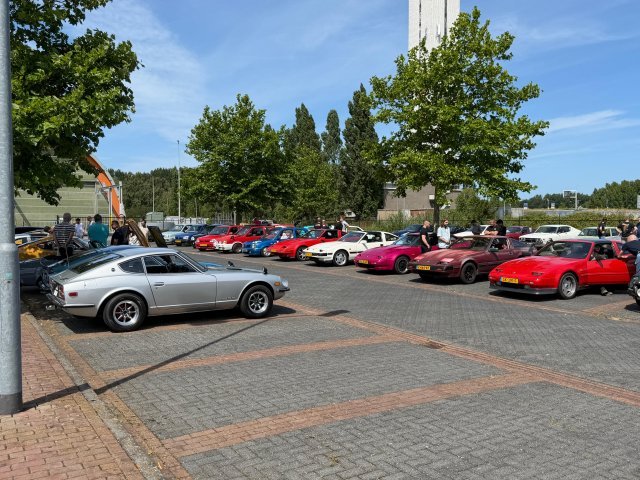
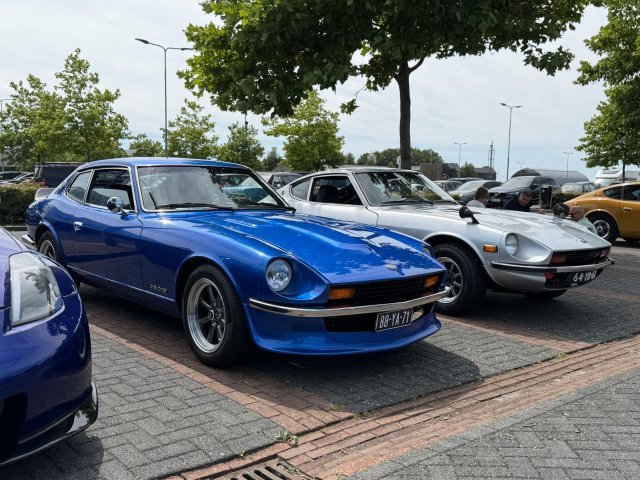
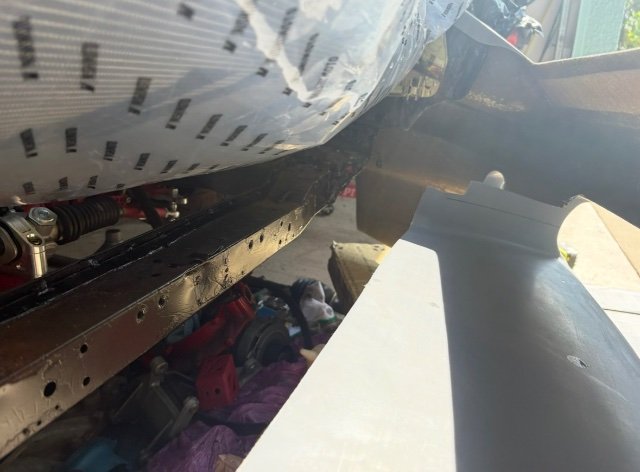
I finally had some time this weekend to work on the Z again and finish off some of the little things that where nagging me. I finished my DIY door card project and got them installed in the car. I must say that they turned out pretty good. The only finishing piece would be to add the wood trim back in but I would have to make one myself. A few weeks ago I managed to pic up a set of Euro taillights from an original Dutch 260z that where in excellent condition. So with the remaining time I had that day I quickly switched them out. Yesterday there was a small all Nissan/Datsun meet I attended which gave me the opportunity to compare my Z with others and do up some inspiration for future modifications. Afterwards I finally had the time to take some proper pictures of the car (with the car not half apart) and cruise along the dikes. WhatsApp Video 2026-07-13 at 09.15.40.mp4
 2 points
 -
can't believe its been almost a month since an update. got the exhaust done, made a tip from stainless. Got the wastegate tube recirculated, header and downpipe wrapped. Have been wiring away. Running an ecumaster emublack ecu and a hardwire electronics PDM25. Both of which are new to me. Got the engine harness done and chassis harness started. thinking thru everything has been a challenge but so far so good. Have the PDM powering all the lights and the ECU functions. Have the factory blinker stalk controlling the blinkers, and high beam functions. Factory brake pedal sensor for brake lights and Blink marine 12 button can keypad controlling some other functions. A couple days ago i did get it to start and that was a huge relief after this long process and "freshish" engine. oil pressure is great. engine is quiet. so very motivating. 20260707_210144.mp4
2 points
-
07-01-2026 ATLAS Z UPDATE: Well in between working on my other Z, I am still working on this Z car. I went ahead and started working on getting the blue painted portions of the body ready for clear coating, and caulking the border of the carbon fiber pieces. Initially I had planned to paint on a fresh coat of factory blue before clear, but I think I may go with the patina finish that is left after smoothing out the paint and getting it ready for the next step. Using "Poppy's Patina" in a high gloss finish....2 coats.....apply and then the next day apply again for 2 coats is the plan for now. This car is meant to just have fun with. It's the project car while I have the other Z anyway. my 240Z is giving me some timing issues to contend with so I have plenty to do. Also put my water meth pump on some steel to start getting the ideas flowing. PICS:
2 points
-
No sir. The ZPS prototype was fitted in 2011. That EZ setup is similar, but it doesn't use torque sensors or an ECU. It's also substantially more expensive. There IS a company that "copied" our design, but they use an inferior motor that isn't for automotive use. Found it odd that they ordered two of our units back in 2014. We've also developed an electrohydraulic system for those wanting to retain a hydraulically-powered rack, but don't want a traditional PS pump hanging off their engine. Ours uses an electric PS pump with remote reservoir (not as popular as the original ZPS kit, but a number of V8 swap S30 guys have bought one. Hope that's all helpful!2 points
-
I found the wire. The black with yellow stripe comes in on the turn signal side of the switch (see picture, blue arrow pointing to the wire). I had the ground connected there. That ground, which is on the turn signal side, connects to the ground on the combination side of the switch (see picture, red arrow pointing to the wires). After that all was good. I wondered why the circuit seemed to work fine with my crossed wiring of the black to black/yellow. As it turns out the switch was finding ground through the wiper motor. As I was tracing the wires for the second time, I disconnected the wires at the wiper motor and found my headlight would go out... Eureka! Problem is now solved. Thanks again !
2 points
-
The settings recommended for my setup (front and rear control arms, front crossmember and quick steering knuckles) by Apex Engineered where: Front: Camber: -1.5° to -2.5° However if it's a street car, it can be reduced to negative one to even zero. Caster: +4° to +6° Toe: 1/16" to 1/8" total toe-in Rear: Camber: -1° to -2° Same as above in the front in terms of camber Toe: 1/16" to 1/8" total toe-in I agree for the most part with these specs but unfortunately this was as far as they could go at the moment. At least the car is way easier to steer now and she drives stable and straight as an arrow. The steering wheel does self-center but it could be a bit more. The rear needs a zero toe or a bit of toe in but for that I need to increase the track width of the control arm a bit and then come back for a new alignment. My shocks are a little done for (especially the right rear is nonexistent) but for just cruising around this is good enough for now. I do plan to install a set of coilovers from Intrax (local to me) or KW. I was considering BC Racing but they were discouraged by the shop if I wanted to have them last more than just 2-3 years especially since I can’t park the car in my garage. Don’t worry, she still has a roof over her head as she is parked under my carport with a cover over her. The more time goes on the more things I want to do, it truly is a never ending project. The next thing I would like to do is add a BRE style spoiler and an air dam as they are a bit cheaper then the rest of the suspension upgrades. After that I want to replace the stock shocks with coilovers and some stiffer sway bars. Way down the line I also want to replace the stock EFI system with a Halltech ECU but I will probably combine that with EFI Hardware ITB’s and a Zstory exhaust system. Separately from everything I would also like to upgrade the brakes for a full set of Willwood disk brakes at some point but that would also require increasing my wheel size to 16 inch. But my current brakes work more then good enough and I like my wheels so that isn’t really a priority. And when everything is set and done and I have some money to spare then I will send the body off for a full restoration and probably some carbon body panels. But those are really long term plans, you might have guessed but I am never ever selling my Z. This thing truly is my one and only dream car and I will pour my heart and soul into it.2 points
-
Good post! I love the annotated pictures.1 point
-
Replacement Door Mirrors for a 1972 240z Nissan The old MSA door mirrors fell apart and I wanted to find a better replacement. After doing some research I found that GM part #987460 refers to the classic chrome outside rearview door mirror used on 1955, 1956, and 1957 Chevrolet passenger cars would be a good fit. I found a kit that provides both left and right mirrors at United Pacific: Item No.110745 Exterior Mirror Bundle for 1955-1957 Chevy Passenger Car (Pair) which includes: · Polished stainless steel mirror head & chrome plated arm with identical design as original. · Convex mirror with wide angle optics for R/H side. https://classic.upauto.com/exterior-mirror-bundle-for-1955-1957-chevy-passenger-car-pair-110745 I purchased the mirror kit at Amazon for $57.69 https://www.amazon.com/United-Pacific-110745-Exterior-Passenger/dp/B07CSM82R6/ref=sr_1_5?crid=3D4VKZQDPPL45&dib=eyJ2IjoiMSJ9.Ji_ewCdOZDHJk5NTl-hJJNFlKNsQBt5lpAOLKHcRoK31x-GRce_gxezK_VKJFo0J9IkZHkDcZBC1uO-yqa9wAikFa3d3ppFs1Z_e9oMH7GHS0hSYXVCL3mPH2KdHlNipyinC19rlSI2bJ2OSt4dOu31VkbQgttxV3F9sjOnvlwdEzUBrH0x35XHZypqXaZKhHaGVoA8HQfe6yph6tpYjD9i1U7980UgA3v1My4M_ZeA.60nOt1lFZGTfNCnWtHJyTgcmFLSL1-4Gz3NCXbznMr0&dib_tag=se&keywords=car+side+mirrors+chrome+metal&qid=1783662323&sprefix=car+side+mirrors+chrome+metal%2Caps%2C189&sr=8-5&ufe=app_do%3Aamzn1.fos.9fe8cbfa-bf43-43d1-a707-3f4e65a4b666 See pictures.
1 point
-
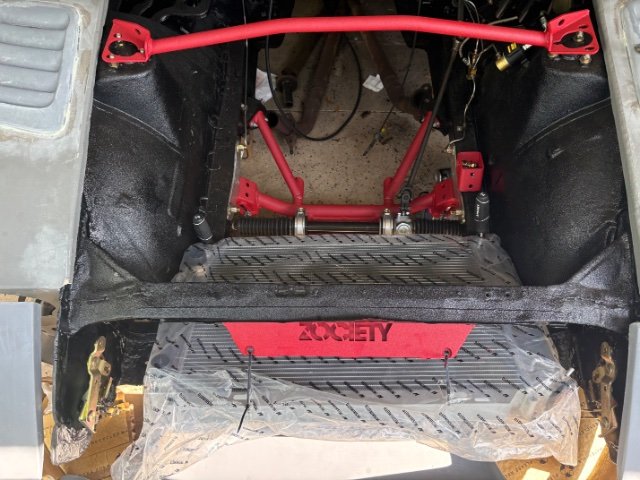
Your engine bay looks very clean, nicely done! You really are flying true this project, keep up the good work!1 point
-
I can’t wait how she looks out in the sun!1 point
-
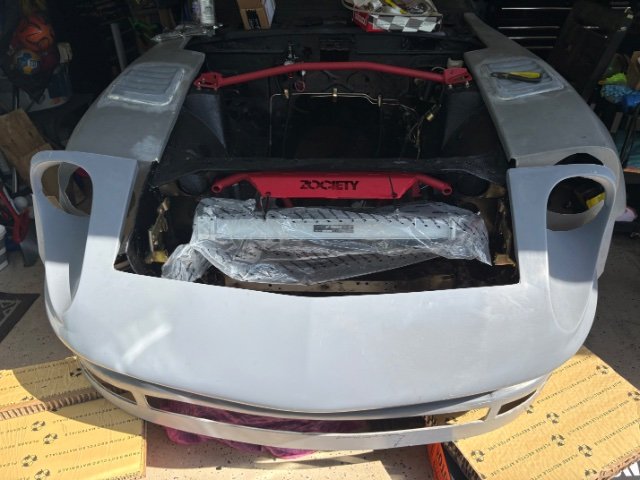
Radiator came in, made a mistake on sizing it, but I think it still works just fine sitting on the frame rails, thoughts? Or should it get something skinnier that fits between the frame rails. I like the built in tray on this bumper, I’ll add some ducting that just continues this on to that bottom rail and continue it past to the end of the radiator.
1 point
-
im not happy voltage drops on this thing. best would be new fuse box re-route wiper and lights. i might try easy re-pin cause common, dome and lights uses same source. if that fuse box connector is some how the issue. on dome light i have not much draw, swap dome and light pins on end of connector1 point
-
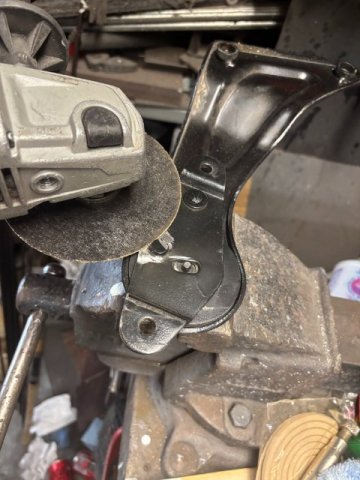
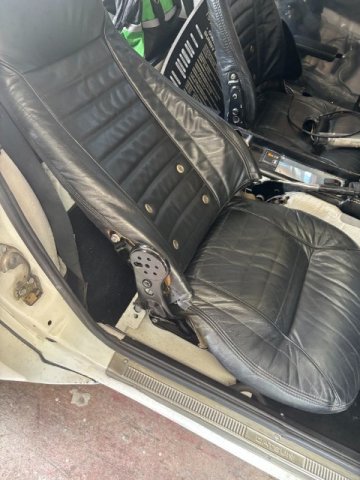
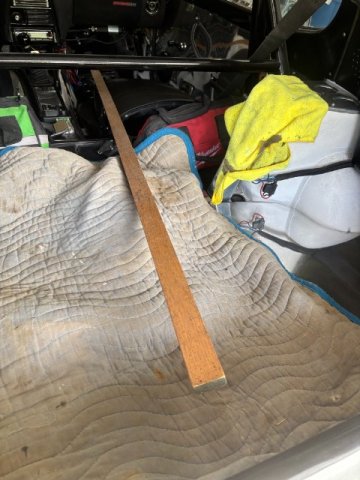
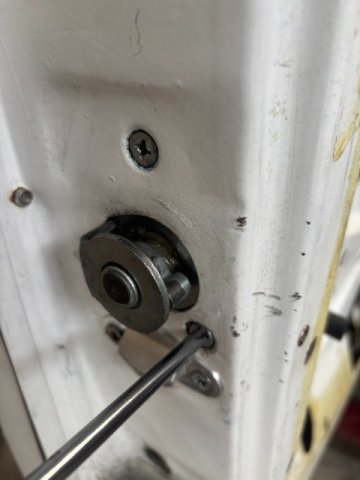
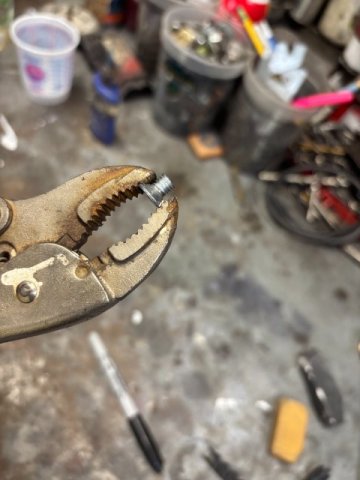
Converting the 240Z Passenger Seat in a Reclining Seat I found a need to convert my Passenger Seat into a Reclining Seat to gain additional Space. I know later models of Z cars 2 PLus 2 need to have Folding Seats to allow additional passengers into the Rear Passenger Compartment. So i removed the Factory Seat Tilting Mechanism and examined carefully. The mechanism consists of a Tilting Cam that limited the Seat Tilt to 15 degrees. A Steel Center Pin, in this case, operated as a Pivot Pin. So, removing the Cam and removing the Two Steel Pins should allow the Full Tilting of the Seat Back. First, Both Steel Rivit Pins had to be removed. A 4 1/2" Rear Angle Grinder with a Gringing Wheel was utilized to remove the pins from both brackets. Grinding the Rivet Heads off with Grinder Removing the Two Steel Pins-see Blue Arrows Internal Parts of the Seat Brackets Two Removed Rivets, Limiting Cam, and Outside Plastic Knob Weld two 12mmx 1.25 nuts to the Bracket Arms Amazon sells the new Plastic Knobs with 8mm x 1.25 x 30mm for $15. They come in a pack of Four Knobs but you only need Two per Side unless you convert the Drivers Seat too. Insert One Knob in the Center threaded hole to Lock the Seat in Upright Position. And Another Knob inserted in Center Hole for other side. Seat Folded Flat with both Knobs Removed-Maximum Space Available. With Both Knobs Inserted , Seat in Normal Position With Both Knobs Removed- Laying Back -Sleeping Position is possible. With Seat in Folded Position- There enough Space to Several 8 Foot Pieces of Lumber in your Z now. i hope this project will make your Z more useful and comfortable.
1 point
-
06-23-2026 ATLAS Z UPDATE. Cut and fit the 4" pipe for the intake. Using a 45 degree bend, and the 90, I cut turn/twist, cut on angles, and as you can see in the pics, trim off pie cuts to get the angles going where I want them to. This requires drawing a line where the pipes have to meet and welded in just that spot. It's exactly what I did with the other pipes. After welding, the welds are sanded down smooth and then my polisher does his part to make it look like a seamless one piece unit. I also used the new air cleaner and marked where further cutting on the hood was necessary and then cleaned up those edges. later, I will spray gloss black into the cap and use some q tips to paint the cut edge and it will blend right in. I also got the call to go pick up my 3 parts I had wrapped in black DRY carbon fiber....the cowl, rear spoiler and front bumper. PICS:
1 point
-
I am using the stock headers. They had to get cut short to make the turn around the frame rails. It is using an OEM ecu ( I believe it was manual) that is running UPRev. The mounts are Mckinney that were sold by ZFever. Not sure how they got them sinze McKinney went out of business a couple of years ago.1 point
-
06-21-2026 ATLAS Z UPDATE. I started with installing my side view mirrors, and then poured in the engine oil....then decided it was time to get the R200 differential and swap pieces done and out of the way. I first had to clean up the gasket surfaces, then I installed a factory NISSAN gasket, and then filled it with 75W140 Synthetic gear oil. Then I masked off and painted the rear cover with silver engine block paint and then a coat of clear. Tthe case itself I wire wheeled clean,t hen wiped it down and gave it a coat of clear. After that, I painted up the 280Z mustache bar in gloss black and then after cleaning and wire wheeling it clean, I painted the front differential mount in gloss black as well, and then put all of it in the corner out of the way. Quite a bit of work to get it all ready for install. I will remove my existing R180 diff and then clean up the entire area like this before installing the rear end. I also have some TT3 Techno Toy Tuning axle shafts with the Porsche 930 CV joints to put in. PICS:
1 point
-
06-20-2026 ATLAS Z UPDATE. I wired the firewall forward body wiring today. I managed to get it all done except for the fans. I also installed the turn signal surrounds and upper and lower grill. In doing this, I also started the run of braided line back to the water methanol tank from the nozzle up front. The electricals for the Boost switch was also wired today into the passenger footwell of the cockpit. I don't have a horn picked out yet, but I now have wiring ready for it. PICS:
1 point
-
so, i failed MOT. there was no brake lights. fixed that it was loose connector on brake light switch but i found that parking light fuse was burning hot, measured current draw it was 5.6amps, seems to be common problem to melt fuse box. i did my math thought aging pressed pins heat cycles might have added resistance between those two connection so i soldered every connection. as i said earlier every load has dropped voltage slightly, no load its 13.8volts, press brake and it drops 13.3V. lights on wipers on fan at full blast i remember seen under 12volts on lighter socket. lets see how it goes after this work, if that park light fuse still gets hot first aid is led bulbs1 point
-
06-18-2026 ATLAS Z UPDATE: Well, after having people tell me about the intake and issues I will have with the MAF meter, and then researching on it, I decided to just redo the intake from the MAF sensor forward. I ordered some 4" pipe, a coupling and clamps and dug in. I did a layout and then cut the hood to start the process of making additional room for a smooth long radius 90 in 4" along with a vortex air cleaner to give the MAF Meter what it needs. In just a couple hours tonight I got a good start on it.....but I will have to do a notch in the radiator support to get the pipe to where it isn't being forced up over it. I am still waiting on the Air cleaner, but the job is well under way PICS:
1 point
-
Thx for the comments. I have tested the switch and harness connection points and all is working as it should from what I can tell. I did install the honda wiper motor swap with relay so that might be causing part of the issue. However, the fact that the blue line goes to 12V when the button is pushed is still an enigma. I believe the wire should connect somewhere but it is not clear on my harness. I have replaced both the dash (used in great condition) and engine (new) harnesses along with the fuse panel to blade type so it could be a mismatch of parts that is creating the issue. For now, I intend to run the blue wire directly to the washer motor so I will at least have washer capability even if I have to manually activate the wipers.1 point
-
Thanks for the feedback!1 point
-
A simple solution for door slamming problem? I finally finished my 8.8 Super Duty 8.8 Differential Conversion so I had time to handle all those small detail work. During my restoration work, I used Precision Weather Stripping to my worn OEM ones. But the Precision Weather Stripping always seemed too stiff for its job. So anyway, I gave them about 4 months but still had to slam the door to seat the weather stripping. It never got better so I know some members used late model KIA weather stripping from Amazon and good results. So I tried the Kia weather stripping. It was a lot softer but still had to slam the door. I decided to remove the Door Latch and study its operation. After removing it, I cleaned it and lubricated it with White Grease. Everthing seemed tested fine when it was out of the car. But after installation, the problem was still there. The Door Latch seemed like it still needed a little more inward movement to function properly. So with the Door Latch installed, I watched the Locking Mechanism operation. As the Door Glass was not installed yet, you have a good view of the Locking operation. this is when I noticed that one of the Latch Mounting Phillips Screws( 6mm x 1.0) was hitting the Linkage. This Screw is 4MM too long. The Easy Solution was to cut off about 4MM of the threaded end of the screw. Pic of the Long Phillips Screw-Inner Bottom Mounting Latch one. ". , Pic of "Corrected Phillips Screw" I really don't know when the Phillips Screw was mistakenly replaced with a Longer One. Owning the 240Z for 54 years, I am sure I removed the Door Latch at least 4 times. Anyway, if you are having Door Slamming Problems, check the LATCH MOUNTING SCREWS. It was a Simple Solution for me, maybe for you, too.
1 point
-
Have you verified your engine is actually at TDC? Your damper or timing marks could easily be off a few degrees. Enough to give you the results you're seeing. Verify TDC with a piece of aluminum rod or a piston stop in the #1 plug and then go from there.1 point